Finally, Something To Do With All Your Old Jewelry

use old jewelry to decorate flower vases

I think it is safe to assume that you have a drawer or box of old jewelry somewhere. It’s jewelry that is broken (with hopes you’ll repair it someday), or not your style anymore. Whatever the reason, jewelry is hard to get rid of. It just feels like you’ll want it someday or that it will miraculously come back into fashion.

Until then, here is a way you can use it while you wait for that day. Continue reading

Make Your Own Bracelets from Costume Jewelry

No tools needed jewelry

My grandma loved her costume jewelry and I am having so much fun with this box of it that was given to me.

DSC05382

Between the broaches, beads and chains, I’ll never run out of things to make with them. A while ago, I used some broaches from this box to make these decorative mirrors.

jeweled mirror

But for this jewelry project, I wanted to make bracelets from this chain necklace.

DSC05383

I decided to make stretch bracelets because they are easy and don’t require a lot of tools or components.

First, using wire cutters (o.k. you do need one tool), cut off just a small section of links.

DSC05386

I just did enough links to cover the top of my wrist.

DSC05387

Then cut a small strip of stretchy cord.

DSC05384

Fold it in half.DSC05397

And loop it through one of the end links.

DSC05398

Then just fold the two ends through the opening to attach the cord to the links.

DSC05399

This will gave you two strands of cord.

If your bead holes are too small to string two strands, forget the folding and looping step and just tie your cord around the chain link. Tie a few knots and trim excess cord, leaving one piece of cord.

Next, string beads onto the cords until it is the right length (there are no set measurements here, just wrap it around your own wrist to determine the length you need).

DSC05390

Then tie the cord to the other end link and tie about three knots.

DSC05391

You can put a few drops of glue or clear nail polish on your knots to secure them.

DSC05396

And that is it!

You can use any kind of bead you have on hand to make a fun variety of bracelets.

DSC05404

If you don’t have costume jewelry on hand from grandma, don’t worry, garage sale season is coming up. That’s a perfect place to find great accessories to craft with!

*

Don’t forget to sign up so these posts come right to you. Just click the Follow button on the sidebar. Thanks!


Hemp Bracelets (Throwback Jewelry)

I saw this great shirt on Etsy and immediately got nostalgic for my days at OU.

i miss athens

While thinking of Athens brings back all kinds of great memories, I can’t help but reminisce on all the hemp jewelry I made while I was there. I haven’t worn hemp since college, but I thought I’d play around with it again since I was feeling so nostalgic.

If you want to give it a try, you will need hemp, beads, scissors, a safety pin and pillow.  Hemp is a natural fiber sold in spools at any craft store. You could also use colored thread or even leather cords.

You’ll want to cut two long strands. I usually do one and a half arm spans for each strand. How’s that for precise?

Then hold the two strands together and fold them in half.

???????????????????????????????

Loop the folded part to create a loop and knot.

???????????????????????????????

Pull it tight to have a small loop and a knot. This will give you four strands coming from your knot. Trim off one of the strands right at the knot so that you only have three strands.

???????????????????????????????

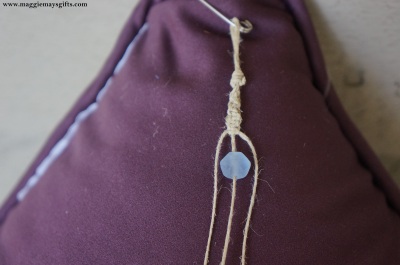
Now pin this to a throw pillow to hold it in place while you weave.

???????????????????????????????

Your center piece stays in one place and you’ll do the weaving with your right and left strand. Bring the left strand down like an L and cross it over the middle strand. Then do the same thing with the left strand but in reverse and underneath the other strands. Then pull the strands up and tight to create a square knot.

pull left string down L and right down L

Continue creating square knots (alternating strands you start with) until you are ready to add a bead. Place a bead down the center strand and wrap the side strands around it in the same manner you would for the square knot.

add bead

tie knot after bead

Continue with the square knots adding beads wherever you like.

When you reach the end, use a different bead that fits into the original loop that you made. This is going to create a clasp.

Put your clasp bead (I used a plastic pearl) on the center strand and tie it in place under the bead. Tie the right and left strands together as well to tie up all the strands.

pearl bead clasp

Then trim all excess strands right at the knots.

trim around clasp

Then place your clasping bead through the loop and your bracelet is complete.

???????????????????????????????

I made some with gold and pearls to see if I could bring hemp into my current life 🙂

???????????????????????????????

???????????????????????????????

???????????????????????????????

I think I like it. What do you think? These also make great friendship bracelets for kids.

This project gave me a chance to get my future bobcat ready. He looks good in hemp 🙂

???????????????????????????????

Note: The I Miss Athens image was used with permission from http://www.etsy.com/people/IMISSMYCOLLEGE. Check them out! They have shirts for almost every school.

Make a pain-free tiara

???????????????????????????????

I’m not sure whose head they had in mind when they made these plastic tiaras, but they seem to draw blood from all of the heads in our house. I mean for fifty cents I don’t expect a custom fit, but it should at least not require a trip to the emergency room.

Since this was a gift, I hated to just throw it away. I thought I would experiment to see if I could find a way for my daughter to wear this thing comfortably.

Not too comfortably, though. I really don’t want to encourage the everyday use of a tiara.

Believe it or not, this thing actually had little tiny, plastic screws that held it together. Once I got those two screws out, the fancy part just came right off!

???????????????????????????????

I just used two plain hair clips and hot glued the tiara to the pincher part of the clip. Be sure not to glue the tiara over the entire opening of the pincher, because then it won’t open and close.

???????????????????????????????

Now it just clips right into her hair like barrettes and the little royal princess can play pain free!

???????????????????????????????

If you enjoy these posts and want to receive them right to your inbox, click on the +follow button.

pain free tiara

Jewelry Embellished Mirrors

I saw these mirrors at a garage sale and I had to have them.

Jewelry embellished mirrors

What I didn’t have to have, though, were the candle holders on them. They had to go, but I had no idea what to do because removing them would leave two holes in the front. I’ve been racking my brain for weeks on this one and then it came to me this morning. I actually think I heard angels singing.

First, I removed the candle holders with a screwdriver and that left the holes I was talking about. Then with just a tiny bit of vinegar and water (but mostly a ton of elbow grease) I cleaned and wiped the mirror and silver down.

Jewelry embellished mirrors Jewelry embellished mirrors

Then I went rummaging through a box of my Grandma Weetie’s old costume jewelry that my dad had given me. I found two beautiful broaches that would be perfect.

Jewelry embellished mirrors

I originally used wire cutters and wire to affix them through the holes and, needless to say, I don’t have that kind of time. That created a whole new project of attaching the wire to the broach and then getting it to fit through the holes correctly.

I happily scrapped that idea and grabbed my trusty old friend, the hot glue gun.

I was able to stick one of the finding parts on the back of the broach into one of the holes. Then I put hot glue through the back of the hole and that seemed to hold that side into place pretty well. Then I just needed a little glue on the back of the other side of the broach to hold it to the mirror and we were all set.

Jewelry embellished mirrorsJewelry embellished mirrors

This turned into such a simple project and I love that it incorporates my grandma’s jewelry. It is a beautiful way to keep her memory alive.

Jewelry embellished mirrorsJewelry embellished mirrors

Thanks for reading!

If you enjoy these posts and want to receive them right to your inbox, click on the Follow button.