Make Sparkle-Toed Shoes With Glitter and Mod Podge

Make sparkle toed shoes with glitter and mod podge
Somehow I have accumulated about a dozen pairs of ballet flats and they are all either grey, black or brown. I wanted to play around with a pair to see if I could add a little pop of color.

Not long ago, I made sparkle dresser knobs with only some Mod Podge and glitter and they were really easy so I thought I’d see if it would work on shoes.

All you need is a pair of ballet flats, Mod Podge, and glitter. With spring on the way, I chose a pastel blend of glitter. Continue reading

Repurpose A Cute Sheet Into A Shirt

The beautiful thing about having your last child is that when he is done with an item (high chair, clothes, etc.) you can get rid of it. No more storing!

The only time this is sad is when they outgrow something that you love.

There was always something about this crib sheet of my daughter’s that made me happy. Once she moved from her toddler bed into a twin, it was time to say goodbye.

Upcycling kids clothes using outgrown items

Continue reading

Save A Stained Shirt

If you ask me, the most useful baby gift you could give to an expecting mother is a huge box of OxiClean. When young kids eat, they usually just aim in the general direction of their head, leaving more food on their clothes (and bodies) than in their mouth.

Usually, I can throw a stained item in the wash right away but every now and then there is a stubborn stain what won’t come out no matter how I treat it.

Here is an example.

save a stained shirt

While the shirt is very clean, it just looks disgusting. It makes me to sad to just throw a shirt away so I wanted to see if I could save it.

I did a similar post with a sweater with a hole in it. You can see how that turned out here.

For this shirt, I decided to save it with hearts.

First, I cut out a heart from pink fabric by folding it in half and drawing half of the heart (just like we did in elementary school).

save a stained shirt

save a stained shirt

Then I cut it out, opened it up and placed it over the stained area. The stains were ALL OVER so I actually had to cut out another heart to cover up another section. Then I just added a couple more hearts for fun. I pinned them in place and sewed them all down with a zig-zag stitch around the edges.

save a stained shirt

Now someone has a whole new shirt!

DSC04529

save a stained shirt

So, if OxiClean is no match for your little food artist, I hope this idea can save the day!

*

If you enjoy these posts and don’t want to miss any, click the Follow button now.

Thanks!

save a stained shirt collage

Fun body shirt

I saw this idea of a body on a shirt and really wanted to try it. It was actually pretty easy.

kids shirt maggie may's

All I needed was a plain white tee shirt, striped fabric,  brown fabric, an old pair of jeans and some white yarn.

DSC04358

I just hand traced a shirt out of the striped fabric based on the neck on my white shirt. I realized after I made it that it would make a cute Where’s Waldo? shirt. So if you want to do that, make sure the stripes are horizontal. I learned that too late.

Then I cut pants from my denim.

DSC04359

I sewed a button on the pants.

DSC04360

I cut brown fabric for shoes and used yarn for white laces.

DSC04361

Then I just lined my pieces up, pinned them in place and sewed them onto the white shirt with a zig zag stitch.

kids shirt maggie may's

This just makes a fun, little shirt.

kids shirt maggie may's

Where’s Waldo?

kids shirt maggie may's

kids shirt maggie may's

If you enjoy fun, DIY ideas, click the Follow button now so you don’t miss any.

Thanks!

Tattooed arm shirt

I saw this adorable costume in the Chasing Fireflies catalog and loved the tattooed shirt concept.

chasing fireflies

I thought it was so sweet and figured it wouldn’t be that hard to make.

I bought some cheap knee-high hose and used colored Sharpies and a tee shirt that I already had. I just put the stocking over my arm to decorate it (yes, it bleeds through and tattoos your arm in the meantime).

DSC03882

Then I just cut off the toe area and turned the stocking and the shirt inside out and pinned the stocking to the rim of the shirt sleeve.

DSC03884

I chose to sew the stocking to the shirt by hand because when I tried to envision using the sewing machine, I just didn’t see things ending well.

Then I turned the shirt and sleeve right side out and that was it.

DSC03989

DSC03940

Obviously this would be great for all kinds of costumes this Halloween or you could just add it to an everyday shirt like we did to send the neighbor kids a message.

DSC04006

DSC03974

DSC03942

DSC03982

If you love easy, DIY ideas, click the Follow button in the sidebar now so you don’t miss any!!

Halloween Spider Shirt

If you are ready to get into the Halloween spirit already, here is a fun little spider shirt you can make for kids that is really easy.

I just used a shirt I already had.

DSC04011

I cut out an oval out of a black skirt I was going to donate because it was handy. You could use felt or fabric. Then I placed it where I wanted it to go to get an idea. I put pins where I wanted to stitch my legs.

DSC04014

Then using a zig zag stitch of my sewing machine, I stitched legs where the pins were and another stitch leading up to the top for the cobweb string.

DSC04015

Then I just sewed my black piece of fabric in the center of the legs with a zig zag stitch.

DSC04016

Finally, I sewed white buttons on for eyes. In the end, I added a few stitches to make a mouth because I felt like he had things to say.DSC04017

And that was it.

DSC04049 DSC04055 DSC04057

Happy October! The best month of the year!

Embellishments To Give One Shirt Many Looks

Back to school time is here so that means clothes shopping!

Here is a fun way to make one shirt have many different looks, saving you money and closet space.

To begin, take a shirt or tank top in a solid color. We are going to be adding removable embellishments on it.

???????????????????????????????

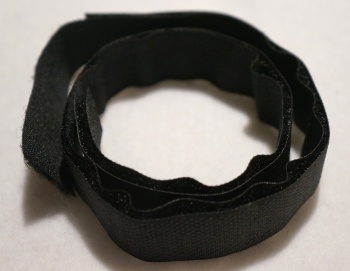
You will want to buy strips of Velcro from a craft store. They come with a strip of the scratchy hook side and a strip of the hairy loop side that go together to hold your pieces together.

???????????????????????????????

For this tank top I wanted my embellishments to go in the upper left corner of the shirt. Once I picked my spot, I sewed a small (about 1″ ) strip of Velcro. I’m not sure if it matters which side of Velcro goes on the shirt. I used a small strip of the scratchy loop side because I feel it is better in the washer and dryer. Just sew it on with a sewing machine or by hand.

???????????????????????????????

For your embellishment pieces, I will show you the ones I made and will explain in detail how to make them in another post. Otherwise, this post will turn into a novel! Don’t worry, you will get the idea, though.

Using ribbon, buttons, felt, and anything else, create decorative pieces for your shirt.

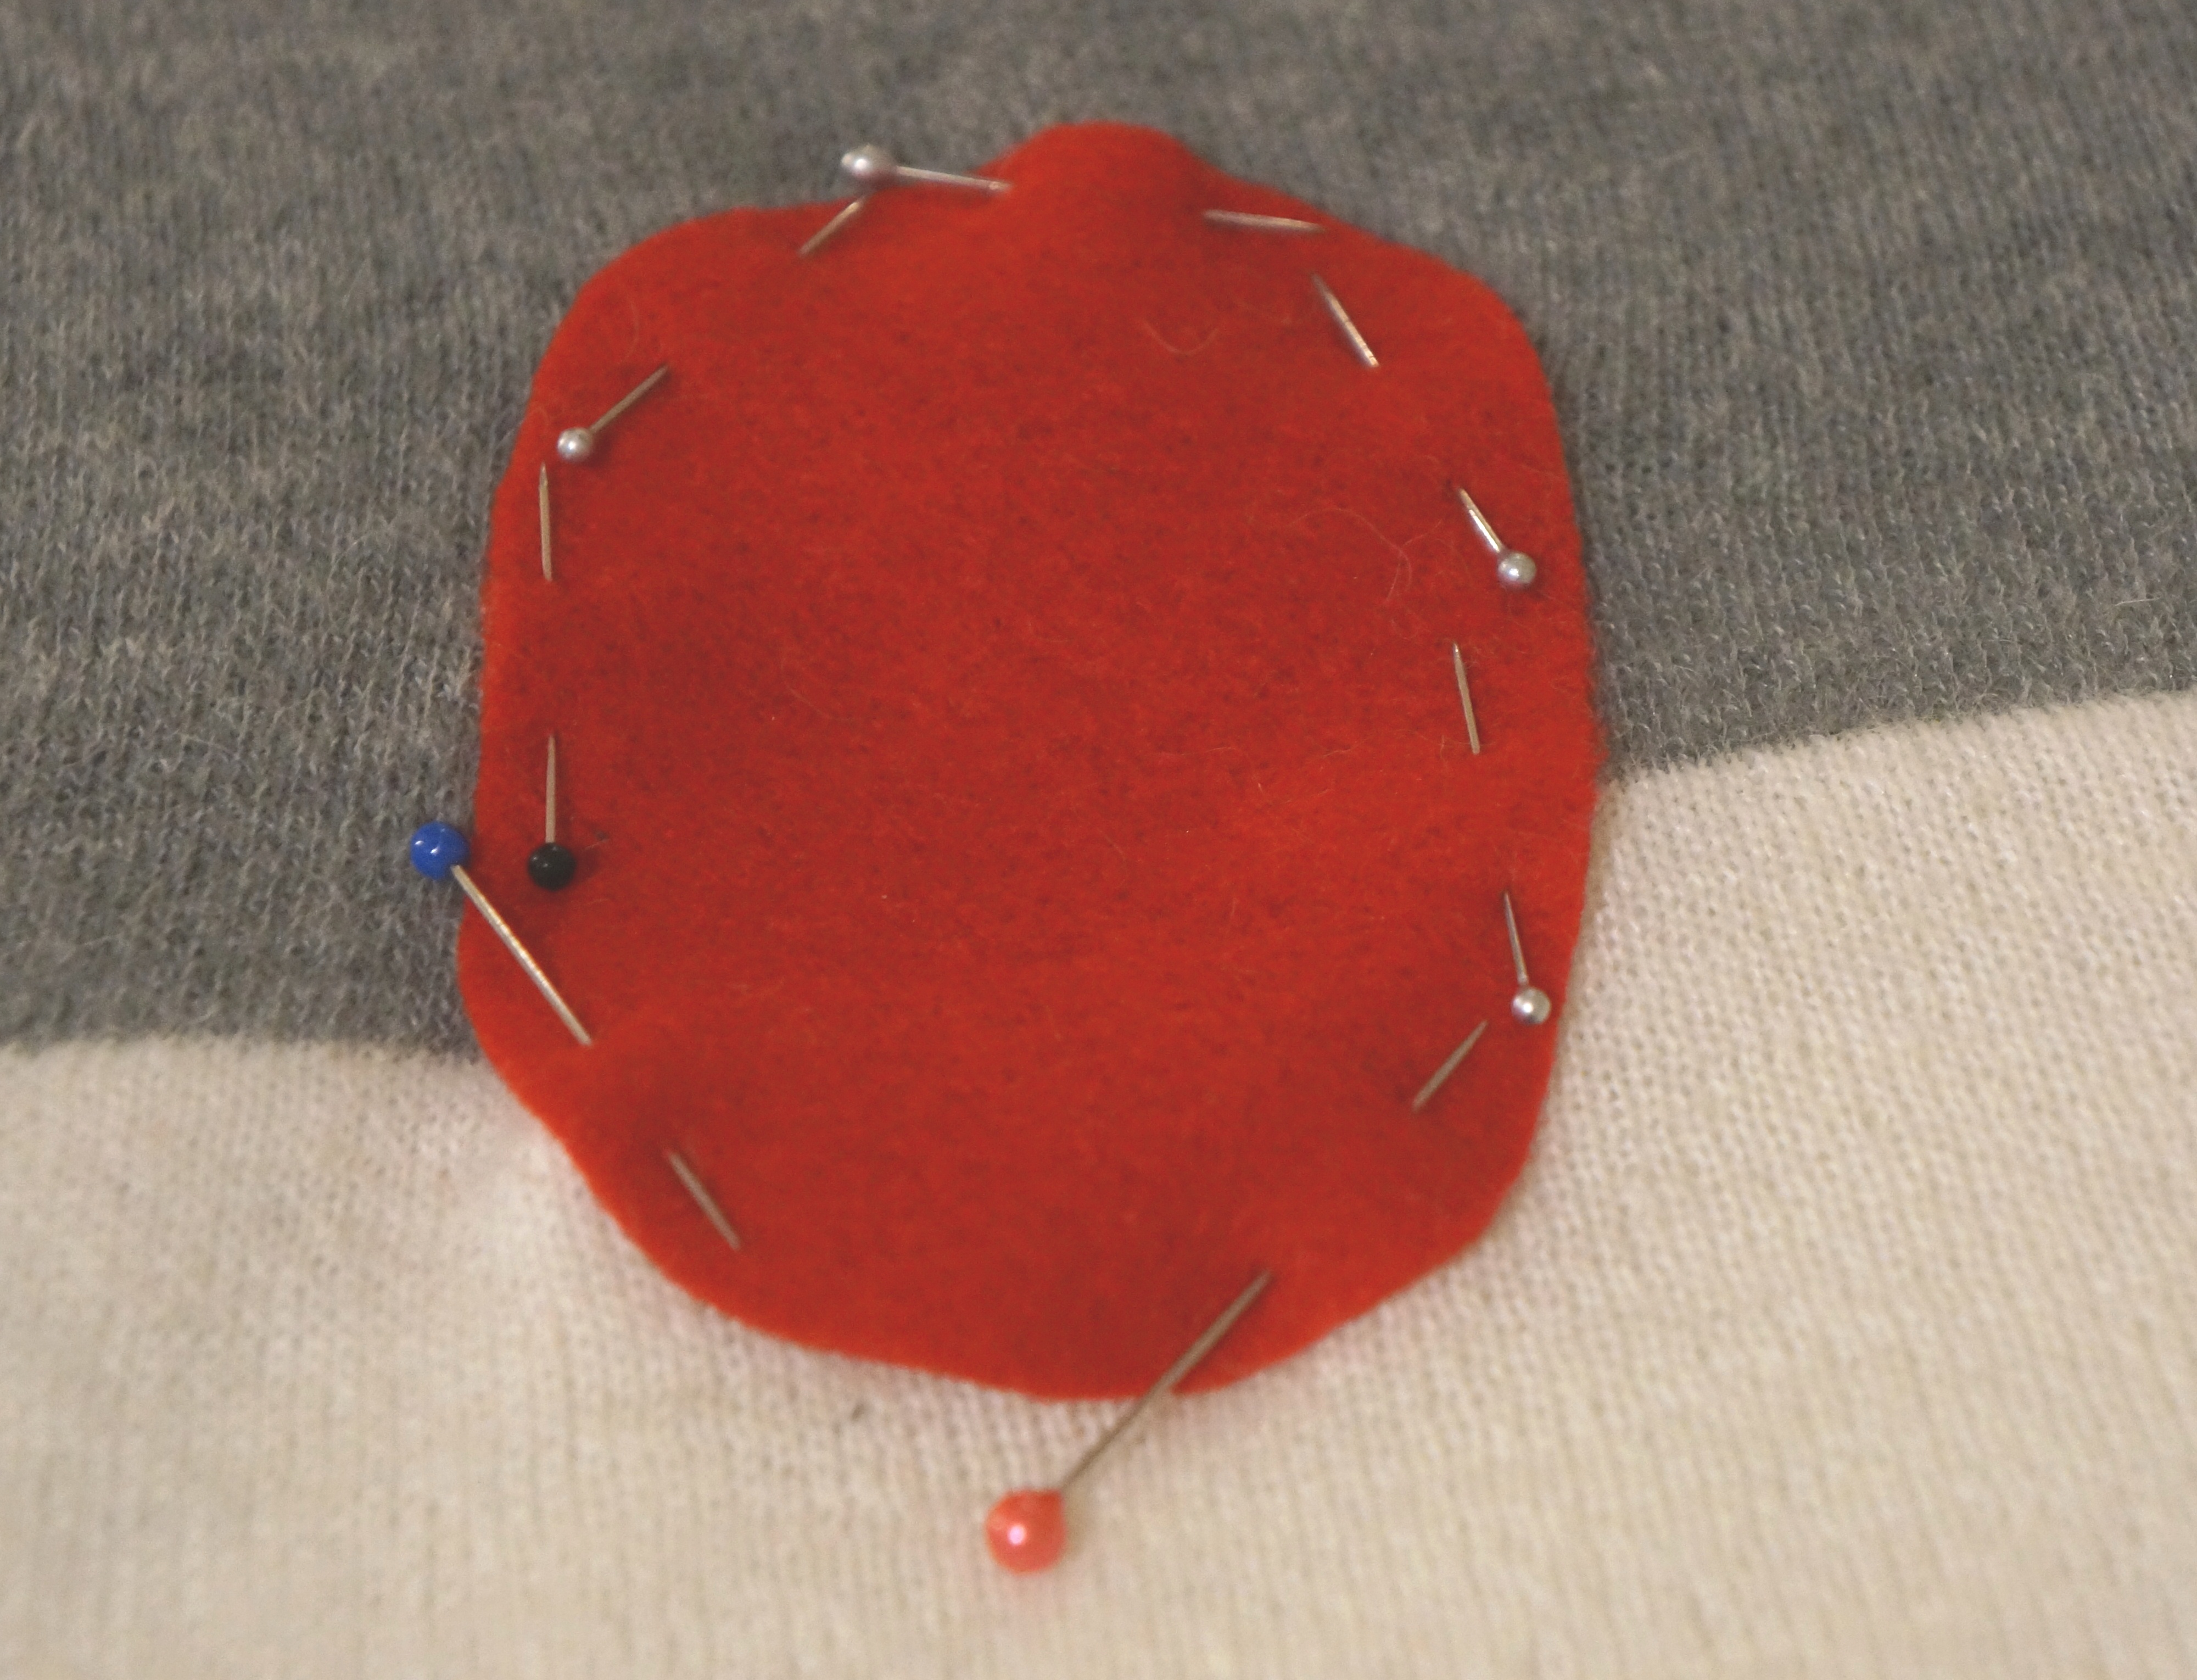
If the back of your piece is flat enough, just glue your opposing piece of Velcro to the back of your embellishment like this:

???????????????????????????????

If your embellishment is not flat in the back (like with a bow) then glue the embellishment to a small piece of felt and then glue your Velcro to the felt.

???????????????????????????????

Now you have removable pieces to change the look of one single shirt. The nice thing is your embellishments can be made of anything without worry of the washing machine. Because they are removable, just take them off before washing to keep them clean and nice.

Here are a couple ideas.

???????????????????????????????

???????????????????????????????

???????????????????????????????

???????????????????????????????

???????????????????????????????

???????????????????????????????

???????????????????????????????

Keep in mind you can do more grown up looking embellishments to change up your own shirts and tank tops too!

Have fun!

Turn a sweater into pillows

Before After Sweater Pic

I rarely buy clothes without trying them on first, but of course the one time I do, I end up with this beauty.

sweater pic with logo

???????????????????????????????

I’m not sure what the problem was. It is a sweater. How hard is that to try on? Whatever the reason, I bought it. When I got home and put it on, I was instantly transported onto the set of The Golden Girls.
The show=awesome. The clothes=even more awesome.

I wanted to do something with it (other than wear it!) because I liked the pattern and the colors. I love the look of sweater pillows and I thought this actually might make cute throw pillows.

Let’s see.

For this button pillow, I cut part of the sweater into two rectangles and sewed them together with the bright sides facing inward. I left one side open and turned the pillow right side out (so my seams were hidden) and stuffed it with pillow filling. I folded my open side down twice and sewed it to the sweater, creating a folded section. I sewed three buttons along the fold for decoration.

???????????????????????????????

For the following sweater, I used a throw pillow that I already had as my base. I placed the corner of the pillow up into the cuff (the white corner was the cuff) and used a button to hide the ends that I had to mush together.

???????????????????????????????

I was able to wrap around the sweater and sew it along the other seam. Since I was sewing the seam on the outside, I decided to do a scrunched look.

???????????????????????????????

With the scraps I had left, I made borders along white pillow cases that I had.

???????????????????????????????

???????????????????????????????

I was able to use up almost all of the sweater!

???????????????????????????????

???????????????????????????????

???????????????????????????????

So before you go buy living room or porch pillows, take a look in your closet first!

If you enjoy these posts and want to receive them right to your inbox, click on the Follow button.

Resurrected Sweater

Save a Sweaterawwww, don’t throw out your poor sweater just because it has a hole in it. Rather than end its life, let it start a new life with a quick patch job.

I actually have to credit this project to my husband. I showed him the hole disappointedly and he said (jokingly), “Why don’t you just slap a patch over it?”

I’m sure he wishes I would just laugh at his jokes. Instead, I take them very seriously.

On the bright side, I called him a genius and left him alone for an hour while I worked on this.

Here is the sad state of the sweater before…

??????????????????????????????????????????????????????????????

First I sewed along the edges of the hole just to clean it up a bit. I don’t know if this was really necessary, but it felt like the right thing to do.

???????????????????????????????

Next, I cut a circle out of red felt just large enough to cover the hole and pinned it in place.

???????????????????????????????

With a zig-zag stitch on my sewing machine, I sewed around the edge of the red patch (twice for good measure) and that was it.

???????????????????????????????

??????????????????????????????????????????????????????????????

Since the patch is on the back of the sweater, it definitely is a different look, but I like it.

You could also do this with clothes that have a stain that won’t come out. Just cover the stain with a patch and sew it on in the same manner.

Now go grab your Goodwill bag and see what you can resurrect!

If you enjoy these posts and want to receive them in your inbox, click the +follow button now.